- Perspective Drawing concerns techniques which add suggest a feeling of depth, dimension, space, or distance to the figure being drawn
Core Principles
- The horizon is the continuous line which coincides with the eye level of the viewer.
- The picture plane stands upright between the artist and the object they are drawing.
- Things that go into the horizon will appear to vanish into a singular point on the horizon called the vanishing point
- Parallel lines converge to the vanishing point assuming they can be extended to meet the horizon line. Hence, even if from above they are the same distance apart, they converge in perspective to the vanishing point. This principle holds regardless of elevation.
- Parallel lines below the eye-level tilt upwards to the vanishing point
- Parallel lines above the eye-level tilt downwards to the vanishing point.
- Parallel lines which are also parallel to the picture frame do not converge to a point.
- The vanishing point moves along the eye level if we turn all parallel lines perpendicular to the height of the space.
- All vanishing points corresponding to the two non-height axes lie in the horizon.
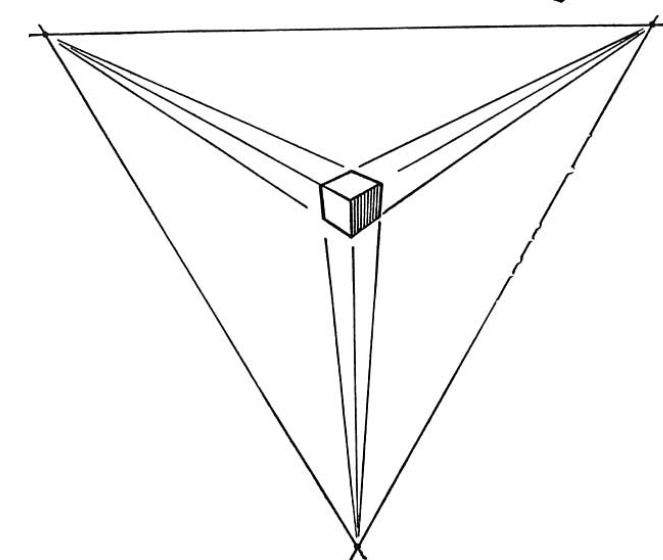
- The vanishing points associated with perpendicular axes (i.e., like what we would find in a cuboid-shaped object) should be widely spaced apart. Otherwise, the perspective will look warped
- Elevation (i.e. sloped objects) converge to vanishing points. The vanishing points lie along a line which passes through a vanishing point in the horizon.
- A view straight up or straight down can be sketched as one point perspective
- When you look downhill or uphill, consider the slope as level. This creates a false line of vision.
- Parallel lines converge to the vanishing point assuming they can be extended to meet the horizon line. Hence, even if from above they are the same distance apart, they converge in perspective to the vanishing point. This principle holds regardless of elevation.
-
We have control over where we place the horizon since it coincides with the eye level line.
-
Perspective drawing is based on the height of the eye level and whether or not the eyes are above or below the objects in the scene
-
An object being rotated on its corner revolves around the point where the pivot point is. Thus, all vanishing points (for parallel axes) are in opposite sides of the center unless we are in one-point perspective.
-
The picture plane defines a center of interest which is “in focus”
- Objects that are too far away from the center of interest will look warped or distorted.
- A key principle then is that Panoramas are impossible to make look right in perspective. We need to limit the view to only a specific part of the wider scene.
-
Perspective drawing also covers proportion. Proportion is merely the size-relation between two objects in the scene. Proportion is considered relative to some standard of height.
-
All circles in perspective will appear as an ellipse.
- The shape of the ellipse is determined by its bounding box. The edges of the rectangle are tangent to the ellipse. The center of the rectangle is the center of the ellipse.
- The major and minor axes of the ellipse are always perpendicular regardless of perspective. This is one way to determine if the ellipse “looks right”
- If the circle is “upright” (i.e., part of an upright cylinder), the drawing is the same regardless of the direction in which the cylinder is turned.
-
When we consider lighting, an object will have a shaded side.
- Darken the part of the object facing away from the light source
- The shape of the shadow depends on the following:
- The direction of the light source relative to the object
- The position of the object in space
- The shape of the area on which the shadow falls.
- Shadows follow the rules of perspective. The edge of the shadow
can be extended to meet the vanishing point of the edge on the object. The edges of the shadow are parallel to the edges of the object.
- See more about shading here
-
Reflections of an object have the same vanishing point as the object itself. This is because, the reflection of an edge is parallel to the edge.
- If the object is at distance
from the reflecting surface, the reflection moves away at an equal distance.
- If the object is at distance
Techniques
-
We can test for proper perspective simply as follows: All parallel lines must meet at the same vanishing points.
-
One technique from Edwards is to close one eye (esp. if the object is close). Copy the flattened projection that you see. Closing the eye removes the effect of depth perception.
-
We can handle proportion by using an object in the view as a reference and drawing other objects in the scene with reference to its size.
-
When placing objects occluded by other objects, it helps to sketch out the boundary too make sure that the objects do not overlap.
- All objects can be placed correctly in perspective by considering the bounding box around it and placing that box accordingly
-
Use intersecting diagonals The center of any object can be found by drawing diagonals between the corners of the face. The intersection of these diagonals is the center regardless of perspective.
- We can also use this technique for spacing objects of the same height. Given the center and three sides, the fourth side can be determined . It is at the intersection of the diagonal and one of the sides not parallel to it.
- We can extend this even further. If we have
divisions running parallel to an axis, then the points where the diagonal intersects these points will correspond to evenly spaced points in the perpendicular axis. - The technique of intersecting diagonals applies even if the lines are not evenly spaced.

- If we require more precision, use techniques from Mechanical Perspective